
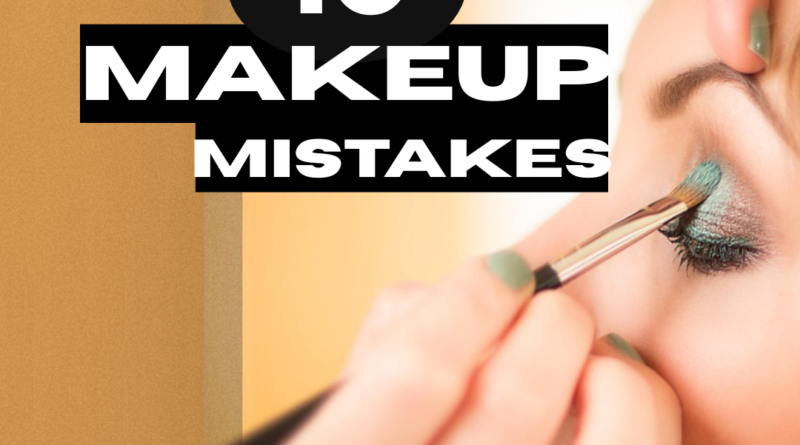
10 Makeup Mistakes That Make You Look Older (Plus What to Do Instead!)
Makeup should enhance your features, not steal your glow. Yet even the most careful routine can accidentally add years—usually because of a few small, fixable habits. We’ve studied the most common makeup mistakes that make you look older, and we’re bringing clear, professional solutions that work in real life.
This guide breaks down each mistake into why it ages you and how to fix it, followed by quick bullet-point alternatives you can try today. From base to brows to lips, you’ll learn placement tweaks, product switches, and application techniques that lift, brighten, and smooth—without caking, creasing, or flattening your features.
How to use this guide
- Start with your base: improve skin prep, shade matching, and thin, flexible layers.
- Then refine eyes, brows, and lips with softer lines, smarter textures, and flattering placement.
- Finally, lock in freshness with selective setting and glow-restoring finishes.
Want flawless skin? Start by fixing these makeup mistakes first.
1 . How Too Much Foundation Leads to Makeup Mistakes
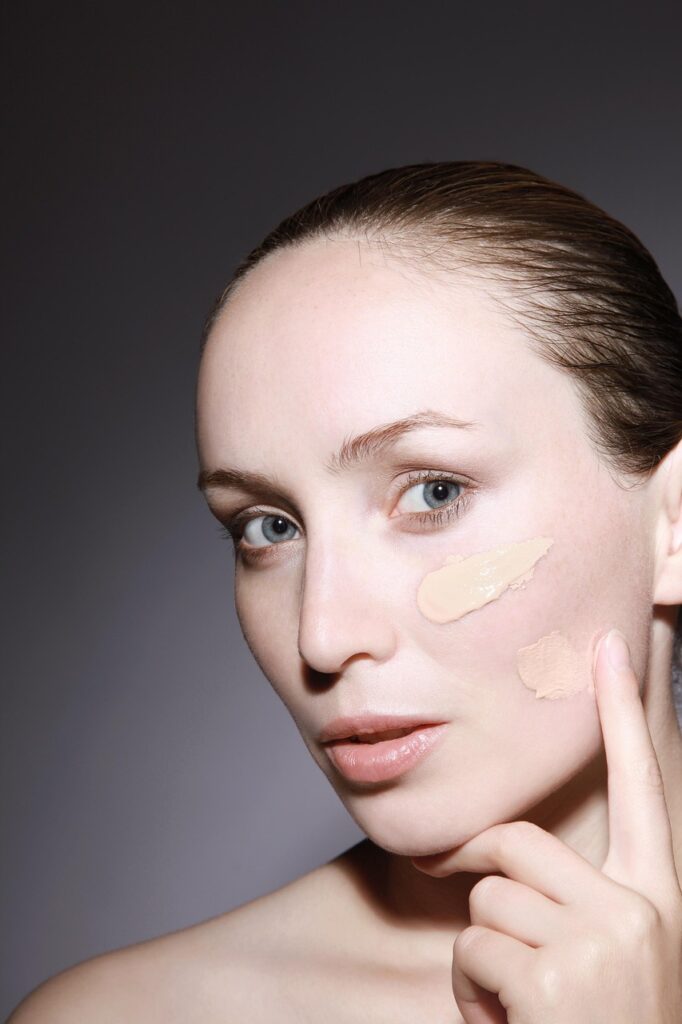
One of the most common makeup mistakes is layering on a full-coverage foundation, which can flatten dimension and accentuate texture. Excess product settles into fine lines, clings to dry patches, and pools around pores and facial hair. The result isn’t “flawless”—it’s cakey, mask-like, and often duller (because heavy matte coverage cancels the natural light bounce that reads as youthful).
Common triggers:
- Coverage anxiety (trying to hide every spot with one heavy layer)
- Wrong formula for skin type (e.g., matte on very dry skin)
- Poor prep (dehydrated skin will drink up water and leave pigments sitting on top)
- Over-setting with powder after a heavy layer (compound texture)
Tell-tale signs you’ve overdone it: base looks thick in daylight, foundation gathers in smile lines, peach fuzz appears more visible, or your neck/face tones don’t match because the layer is so opaque.
The better approach: thin, strategic, skin-like
Younger-looking makeup comes from sheer, flexible layers that move with your skin. Aim to even out rather than erase.
Smart alternatives & fixes
- Downshift the base
- Try skin tints, serum foundations, or lightweight, buildable liquids (medium coverage you can sheer out).
- Mix one tiny drop of foundation with moisturizer or a hydrating primer to create a custom tint (layer SPF underneath—don’t mix it).
- Choose a satin or natural finish over flat matte for most skin types.
- Target, don’t blanket
- Start in the center of the face (around nose/cheeks) and blend outward—skip areas that don’t need coverage.
- Spot-conceal redness, sunspots, and blemishes after your first sheer layer instead of painting the whole face.
- Match like a pro
- Shade-match to the side of the jaw/neck and check in daylight.
- Pick undertones that mimic your skin (neutral/olive/warm) to avoid looking ashy or muddy.
- Prep = payoff
- Hydrate with humectants (e.g., hyaluronic acid, glycerin) + emollients (e.g., squalane) so pigment doesn’t sit on dry flakes.
- Let SPF absorb for 10–15 minutes before base to reduce slip and pilling.
- Consider multi-priming: pore-blurring on the T-zone, hydrating on cheeks.
- Apply with intent
- Use one pump or less to start.
- Apply in micro-layers, allowing 30–60 seconds between passes.
- Damp sponge press (bounces off excess), or a soft brush, then sponge to finish.
- Set strategically
- Powder only where you crease or get oily (sides of nose, smile lines, T-zone).
- Prefer finely milled, translucent powder; press, don’t rub.
- Finish with a hydrating setting mist to melt layers and restore radiance.
If you already applied too much (quick rescues)
- Melt & lift: Mist with setting spray, then press a damp sponge to pick up excess without disturbing coverage.
- Blot then blur: Use blotting paper on the T-zone, tap a pinch of translucent powder only where needed.
- Re-hydrate edges: A drop of facial mist on a sponge can sheer out heavy areas (cheeks/forehead).
- Selective redo: Remove cakey product around nostrils or smile lines with a cotton bud + micellar, then reapply a tiny amount.
Tailor to skin type. (Understanding your skin type helps you avoid costly makeup mistakes.)
- Dry/Mature: Hydrating or serum foundations; avoid alcohol-heavy mattes. Cream blush/bronzer; minimal powder.
- Oily/Combo: Lightweight, oil-controlling formulas; thin layers + targeted powdering. Consider a blurring primer only where needed.
- Textured/Acne-prone: Thin base + spot correction with high-coverage concealer; avoid rubbing—press product in.
Your skincare routine can directly impact how visible your makeup mistakes are. Keep your skin young with these tips. (click here)
2. Skipping Primer
A shade that’s too light washes you out and spotlights texture; too dark or the wrong undertone looks muddy/ashy, flattening dimension. A visible face–neck mismatch or oxidized (orange) base makes makeup obvious, not youthful.
Fix it:
- Swatch jaw → onto neck and check in daylight; wait 10–15 min for oxidation.
- Match depth + undertone (cool/warm/neutral/olive). If your neck is lighter, match the neck and add warmth with sheer bronzer; if your chest is darker, match closer to chest.
- Correct color first, don’t mask: green for redness, peach for blue/purple under-eyes; then apply a thin true-match base and spot-conceal.
- Reduce oxidation: oil-control prep on T-zone, choose natural/serum finishes, and use micro-milled translucent powder only where needed.
- Keep adjusters (white/deepening/olive/yellow/blue) to micro-tune one drop at a time; maintain summer + winter shades in the same line and mix mid-season.
- Blend into hairline/ears, pull a sheer veil down the neck for continuity.
Pro tip: If the base looks off after application, mist lightly and press with a damp sponge to fuse layers, then fine-tune tone with bronzer (too light) or a touch of brightening concealer (too dark).
3. Neglecting Skincare Before Makeup
Skipping prep leaves your skin dehydrated, flaky, or oily, so foundation clings to dry patches, sinks into fine lines, and breaks apart on the T-zone. Texture looks louder, glow disappears, and coverage turns cakey by midday.
Fix it:
- Do a 2-minute AM prep: Cleanse → hydrating serum (hyaluronic/glycerin) → moisturizer matched to skin type → SPF 30+. Let SPF set 10–15 min before makeup.
- Exfoliate smartly: 2–3×/week with gentle acids (lactic/PHA). Skip harsh scrubs on makeup days to avoid micro-flakes.
- Moisturize by skin type:
- Dry/mature: ceramides + squalane or rich cream.
- Oily/combo: gel-cream with niacinamide.
- Sensitive: minimal layers, fragrance-free.
- Spot prep: Dab balm on flaky areas; blot oil on the nose/forehead before base.
- Eye & lip prep: Thin layer of emollient eye cream and lip balm 5–10 min before concealer/lip color.
- Hydration fuse: Light mist → apply base → mist again, then press with a damp sponge to melt layers.
- Hygiene = texture control: Clean brushes/sponges weekly to prevent bumps and patchiness.
Pro tip: If the base looks dry after application, tap a drop of serum or moisturizer over cheekbones with clean fingers, then mist—instant soft focus without disturbing coverage.
4. Too Much Concealer Under the Eyes, among the most common Makeup Mistakes
Thick concealer settles into fine lines, clings to dryness, and turns ashy or gray over dark circles. Going too light creates harsh contrast and emphasizes texture; “baking” with heavy powder adds crepeiness – hello, tired eyes.
Fix it:
- Prep wisely: Apply a thin layer of eye cream, wait 5–10 min, then blot excess so makeup won’t slip.
- Correct, then conceal: Tap a peach/salmon corrector only on the darkest shadow (inner corner/hollow). Follow with a lightweight, elastic concealer that matches your undertone and is ½–1 shade lighter max.
- Place less, blend smarter: Dot 3 tiny dots at the inner corner and trough, keep outer crow’s-feet almost bare. Blend by tapping (ring finger or damp sponge). Warm the product on the back of your hand first for a thinner layer.
- Skip the bake: Set only where you crease with a pinch of micro-fine translucent powder pressed in with a puff. Or lock with setting spray on a sponge to avoid dryness.
- Brighten without bulk: Use a luminizing pen (subtle, not glitter) on the inner corner and a peachy cream on the tear trough to lift without thickness.
Pro tip: Overdid it? Mist lightly, then press with a damp sponge to lift extra product. Roll a clean cotton bud through creases, and tap a trace of eye cream on top to re-hydrate and blur.
5. Skipping Blush

This is among the most common makeup mistakes – Without blush, the face loses natural flush and dimension, reading flat, pale, and tired—especially on camera. Bronzer and contour can sculpt, but without a hint of healthy color, skin looks dull and older. Here you can check out some more common blush mistakes.
Fix it:
- Choose the right formula:
- Dry/mature: Cream or liquid blush (satin—not glitter) melts into skin.
- Oily/combo: Long-wear liquid or powder over set T-zone.
- Shade match to undertone:
- Warm: peach/apricot/coral.
- Cool: rose/berry.
- Neutral/olive: soft mauve or neutral peach.
- Placement = lift: On a relaxed face (don’t grin), tap color on the upper outer cheek, then blend slightly toward temples. Avoid placing low near the nasolabial fold—it drags features down.
- Layer for longevity: Apply a thin liquid/cream first, then a whisper of matching powder to lock it (or set with setting spray and press with a damp sponge).
- Blend texture-smart: Use fingers or a damp sponge for creams; a soft, not dense, brush for powders. Add a touch to the bridge of the nose for cohesive, fresh warmth.
- Balance the look: Pair with soft highlight (no chunky shimmer) and a harmonized lip (tint or balm) for youthful cohesion.
Pro tip: If you overdo it, veil with leftover foundation on your sponge—it instantly softens without wiping everything off.
6. Using the Wrong Blush Placement
Blush placed too low (near the nasolabial fold) or too close to the nose drags features downward and emphasizes texture. A harsh stripe under the cheekbone reads dated and hollow; color too far back by the ear leaves the face flat and wide. Learning from your makeup mistakes is part of mastering your beauty routine
Fix it:
- Place on a relaxed face (don’t grin). Find your spot: keep two fingers from the nose, start above an imaginary line from the nostril to → ear, and center under the outer iris.
- Lift, don’t drop: Tap blush on the upper outer cheek (top of cheekbone), then blend up and back in a soft C-shape toward the temple—never down toward the mouth.
- Stack correctly: Bronzer under the cheekbone for depth, blush on top for color, subtle highlight above for lift.
- Match formula to skin: Cream/liquid (dry/mature) → tap with a damp sponge; long-wear powder (oily) → soft brush, light layers.
- Face-shape tweaks:
- Round: higher, slightly diagonal placement to elongate.
- Long: more horizontal sweep across the upper apples.
- Heart: keep color on the outer cheek; go light near the temple.
- Square: soft circular blend to diffuse angles.
- Edge control: If color creeps low, veil with leftover foundation on your sponge or a touch of translucent powder to lift the lower edge.
Pro tip: Smile only to locate the apple—then relax and place the color where it sits when your face is at rest.
7. Ignoring Eyebrows
Many beginners don’t even realize they’re making makeup mistakes until someone points them out. Blush placed too low (near the nasolabial fold) or too close to the nose drags features downward and emphasizes texture. A harsh stripe under the cheekbone reads dated and hollow; color too far back by the ear leaves the face flat and wide.
Fix it:
- Place on a relaxed face (don’t grin). Find your spot: keep two fingers from the nose, start above an imaginary line from the nostril to → ear, and center under the outer iris.
- Lift, don’t drop: Tap blush on the upper outer cheek (top of cheekbone), then blend up and back in a soft C-shape toward the temple—never down toward the mouth.
- Stack correctly: Bronzer under the cheekbone for depth, blush on top for color, subtle highlight above for lift.
- Match formula to skin: Cream/liquid (dry/mature) → tap with a damp sponge; long-wear powder (oily) → soft brush, light layers.
- Face-shape tweaks:
- Round: higher, slightly diagonal placement to elongate.
- Long: more horizontal sweep across the upper apples.
- Heart: keep color on the outer cheek; go light near the temple.
- Square: soft circular blend to diffuse angles.
- Edge control: If color creeps low, veil with leftover foundation on your sponge or a touch of translucent powder to lift the lower edge.
Pro tip: Smile only to locate the apple—then relax and place the color where it sits when your face is at rest.
8. Harsh Eyeliner (Especially on the Lower Lash Line)

Minimalism in beauty often reduces the chances of visible makeup mistakes. Thick, stark-black liner—especially along the lower lash line—shrinks the eyes, emphasizes under-eye darkness and fine lines, and pulls the gaze downward. Hard, unblended edges on crepey lids read heavy and dated.
Fix it:
- Soften the shade & texture: Swap jet black for deep brown, charcoal, or plum in a creamy pencil you can smudge.
- Tightline up top: Line the upper waterline to add fullness to lashes without visible heaviness.
- Keep lower lash light: If you line below, keep it to the outer third only, smudge softly, and skip the inner corner.
- Open the eye: Use a nude (not white) pencil on the lower waterline to counteract shadows.
- Lift the angle: Make the line thinnest at the inner corner, slightly thicker at the outer third, with a micro-flick upward—never drooping.
- Hooded/crepey lids: Use shadow-as-liner pressed into the lash base; avoid thick liquid wings that crack.
- Lock it in: Set pencil with a matching matte shadow to prevent transfer, then curl lashes + lengthening mascara to lift.
Pro tip: If it looks too harsh, trace the edge with a cotton bud + micellar, then buff a neutral shadow over the seam for an instant soft-focus lift.
9. Skipping Mascara or Curling Lashes

Downward or straight lashes cast shadows on the under-eye, exaggerating dark circles and fine lines. Without curl and definition, the visible iris and sclera (the white of the eye) look smaller, so eyes appear dull and tired.
Age naturally brings lash thinning, lightening, and loss of lift – skipping curl/mascara removes a key counterbalance that keeps the eye area bright and open. Uncurled uppers also touch lower lashes/skin, causing transfer and “raccoon” smudges that settle into creases.
Finally, a bare lash line lacks contrast, making lids look heavier and dragging the outer corner (where many people already have a slight downward tilt with age).
Fix it:
- Curl in stages: Clamp at base → mid → tips for 5–8 sec each; keep the curler clean and pads springy. Optional quick warm-up (1–2 sec with a dryer—test on your wrist first).
- Anchor the curl: One thin waterproof coat first (holds shape), then a lengthening/lifting formula. Wiggle at the roots, pull through; do two light coats max.
- Prevent clumps & smudges: Wipe the wand, comb with a clean spoolie while wet. Choose a tubing mascara if you get transfer; set the lower eye area with micro-fine powder.
- Strategic emphasis: Tightline the upper waterline for fullness without heaviness. Focus extra lift on the outer third to counteract droop.
- Lower lashes: Use minimal product or skip entirely if you crease/smudge easily.
- If lashes are straight/sparse: Try a heated curler, individual/half lashes at the outer corner, or a peptide lash serum nightly.
- Gentle removal: Use an oil cleanser (regular) or warm water (tubing) to avoid tugging and lash breakage.
Pro tip: Apply while looking down into a mirror with your chin slightly up—this exposes the roots so you can load lift where it matters most without stamping your lids.
10. Using Dark, Heavy Lip Liner

A harsh, high-contrast outline shrinks the lip visually, accentuates vertical lip lines, and creates a dated, “drawn-on” border. Dark liner that’s lighter in the center (or left unblended) exaggerates feathering and makes lips look thinner and drier—both classic aging cues.
Fix it:
- Shade match: Choose an Aliner that matches your lipstick or natural lip tone (±1 shade). For depth, keep the border neutral and deepen with color inside, not on the edge.
- Soften the edge: Feather the liner inward with a brush before lipstick; avoid a hard ring.
- Subtle overline: Trace just outside the vermilion border at the cupid’s bow and center of lower lip only—stay on the border at the corners to avoid a clown mouth.
- Prep = plump: Exfoliate, balm, then blot. Opt for creamy/satin formulas or add a touch of gloss at the center for volume.
- Stop feathering: Use a clear/wax lip liner or lip primer around the border; set the perimeter with a trace of translucent powder.
- Color harmony: Pair rosy/peach liners with similar lip tones; avoid very brown liners unless the lipstick matches.
Pro tip: To instantly modernize, apply lipstick first, then tightline the outer edge last with a matching pencil—micro-corrects shape without a visible ring.
Which makeup mistake have you fixed recently?
It’s amazing how much a little awareness can transform your daily look. When you take the time to refine your technique—blending a bit better, choosing softer tones, or focusing on balance—your natural beauty stands out effortlessly. I’d love to hear what changes made you feel more confident and radiant below.